Quantcast
Channel: Frabjous Couture
Viewing all 178 articles
Browse latest View live

On my sewing table: Pleated silk skirt

$
0
0
I have a confession to make, readers. I have never made a pleated skirt before. Ok, I did, tried, but the pleats were a little messy, overlapping or spreading around the hips. Not significantly, but annoying enough to produce a wadder. What has changed? I've learned how to integrate the dart intake in pleats, and if you do not possess an 'ideal' figure, it is not done equally, readers. But more about it in a separate post  - it requires a more complex graph to demonstrate it, and I will post it once I the pattern is ready. Here I just wanted to show you the style I decided to make and my fabric choice (from the stash, readers - hail to stash busting!).


To make this skirt I decided to use this medium-weight Oscar de la Renta from my fabric stash. I bought it at Mood maybe two years ago, but in case you like it, they still have it in two other colors online. I think the weight is good to give a pleated skirt some body and structure, not too thin, not too stiff.


Now, let me warn you - this is my first pleated skirt based on this method and it may still go wrong. So just wish me luck and do tell me what's your experience with pleated skirts? Have you used commercial patterns or drafted it yourself? What was the outcome?


And the winners of the Threads Magazine are...

$
0
0

and 

SewingElle of He Cooks... She Sews

Please contact me with your mailing address at mvk(dot)fashion(at)gmail(dot)com, and thanks to everyone for congratulations and participating!  

Dart placement in the skirt

$
0
0
As I am delving further into the new patternmaking method by a Russian designer and patternmaker Galya Zlachevskaya (more about it later) I am gaining much better understanding of the general principles. It has often annoyed me in other systems that you had to memorize, or frequently refer to, extensive tables and formulas for dart placement, for example. The graph that I am placing below gives answer to many questions about skirt dart placement.

adopted from a book by a Russian designer and patternmaker Galya Zlachevskaya

What I am learning is that darts should be distributed at the hip line within dedicated areas only. Where precisely they are placed depends on the individual body and aesthetics. Let's take hip circumference of 90cm (35.4") - I will be using metric system from here on because of the ease of calculation with decimal numbers.

1/3 of the hip circumference in the front area (30cm in our example) can be used to place our front darts without hardly any effect for the fit. You can move them closer to the side seam or to the center front - it won't matter much unless you have some pronounced curves - in this case you will want the darts to place so that they help create an appropriate shape around your tummy.

Same applies to the back area: 1/3 of the hip circumference (30 cm for our example) for the back darts (there could be two, four, six, or even more darts), which should point at the most prominent part of your buttocks, or, as a less accurate solution, placed in the middle between center front and side seam

What you can't do is move your front or back darts to the side darts area (that extra intake at the side seam), which takes up approximately 1/6 of the hip circumference (15cm in our example). That also gives you a range for the side seam movement. Adding 1cm, or more, to the front or to the back is, actually, purely a design decision, not a construction necessity as it is sometimes presented. On the graph, though, the hip circumference is distributed equally since this is the easiest for the calculations for a basic straight skirt - the first project in this patternmaking course.

This whole dart placement rule makes even more sense if you are designing a pleated skirt. I am talking a pleated skirt where pleats are only pressed and start at the waist (not mid-hip). Why? If you are not curvy you may be just fine with the most common way of creating pleated skirts:

(hip circumference - waist circumference) : number of pleats = pleats reduction at the waist. 

This would work great for a perfectly round ball, but our waist looks more like an ellipse from the top with slight deviations. So, if you are slightly curvier, even distribution at the waist can lead to a problem when some pleats overlap where less intake is needed (usually in the front), or spread where the intake in not sufficient (usually in the back, or on the sides).

In the past two days I have browsed internet in search of a perfect pleated skirt and realized a pleated skirt is not possible without compromises. I will continue on this subject later... Today, I would love to hear your comments about this dart placement rule! Please leave your comments and feedback about the subject. 

A correction to the post on darts

$
0
0
Dear readers, it happens to me as well - I misled you in my previous post and feel really embarrassed about it. The dart placement areas should be determined at the hip line, not at the waist line, according to the author - I corrected everything in the original post. I must add that I am still testing this patternmaking method and will keep you updated!

Sorry!

New vintage trends and pattern matching

$
0
0
Few weeks ago, I spotted this skirt by the Vivienne Westwood Anglomania label. It sold out on net-a-porter for a 'mere' $519 - it's her mass market line after all, right? But I loved the skirt for its pleat manipulation and some vintage feel (just imagine it with a petticoat)


Now, imagine my surprise when I went through my skirt patterns and found this:


There is of course, some difference between the skirts: the pleats on the pattern cross, while the VVA pleats cross on the right, with one more slanted pleat on the left.  To be honest, I like the pattern version more, but I absolutely love the blown up digital print on the VVA skirt.

The bad thing is the pattern is for the 33" hip, just a few inches less than mine. And with all that dart intake obsessiveness going on on my mind, I think I will just draft a new pattern based on the vintage one. That is if I have time for it - I still need to finish two summer skirts for myself and a dress for a client.

By the way, I found the same skirt on Zappos, but this time it is in solid cotton. What a difference, right?


What recent trends do you love, readers? I know, we all love timeless pieces, but maybe there is something new you discovered this season or two?

Pattern Magic 2 and another Giveaway!

$
0
0
One Pattern Magic book is not enough, readers, right? We just have to take a peek at the Pattern Magic 2. And yes, Laurence King Publishing is again giving away one copy to a lucky reader of this blog. But let me show you what's at stake.


The book starts with an intriguing design where a three-dimensional shaping is achieved using design lines instead of traditional bust, shoulder and waist darts. Relatively simple once you know how it works.


Before, I was often intrigued about the process of incorporating design lines - those seams and details that usually don't serve as shaping. Nakamichi's method is mostly free of trial and error - with some fabric manipulation you may just draw a shape on your three-dimensional sloper, cut along the new lines and get a pattern. It is the best method I know, in my opinion, but still it is not that simple. It would only make sense to try the project illustrated by Nakamichi before attempting own design, as you won't come around making some slits and folds in places where the pattern won't lie flat - this does require some guidance, at least for the first time.
"Always be flexible in your thinking as you find ways to complete your garment," - a reasonable advice from Nakamichi since many of her designs are very much a launching pad for your creativity.
 PART 1: PLAYING WITH GEOMETRICS

Geometry is the main topic of this book section as Nakamachi integrates different shapes into her designs.
"...When you wrap these shapes around you, the excess fabric flares or drapes elegantly. I also tried incorporating artistic forms and details. Geometric figures can produce beautiful shapes."
Yes, some of these garments are truly artistic and, for me, less wearable, but I love peeking at the engineering process so well illustrated in Nakamichi's books. It's like being in a museum archive and being able to touch and examine the pieces.Yet there are also styles that can make a great addition to your wardrobe. Here, my favorites:

(From top left) Just like a stole, A ball-shaped accordion (jabara), Wearing a square, Square accordion (jabara)

PART 2: DECORATIVE STRUCTURES
"Twisting, catching, draping - various methods with which to capture different qualities of fabric and  incorporate them into elegant garments"
I love this part which is full of beautiful and intricate styles and my absolute favorite that I plan to try for a summer style is the Flip turn, and its variation Flip turn for a draped effect.


"I increased the depth of the shadows by rotating the fabric and then flipping it over like the flip turn of swimmers in a pool."- no worries, readers, if this rather poetic explanation don't help a lot, diagrams in the book are more illustrative.
Another great pattern manipulation technique to learn is Different facings, different looks. It is amazing to see how differently shaped facing change the look of an almost identical bodice.


PART 3: IT VANISHED

Fun, fun, fun part for anyone who loves intriguing garment details: a vanishing scarf, a vanishing tie, a vanishing lapel, and three variations of a vanishing pocket.


THE BUNKA-STYLE SLOPER FOR AN ADULT WOMAN

 One problem a novice to patternmaking may encounter is the bodice sloper in the book. 


"The Bunka-style sloper (block) for an adult woman," says Nakamichi, is "created for the body shape of the modern Japanese women." 

What that means to someone who has a similar shape like me - a relatively curvy, pear-shaped body - is that we either have to do a few fitting adjustments to the sloper, or try to manipulate an existing fitted sloper before proceeding with the projects.  Overall, I don't think it is a huge issue, because it is a good habit to work with a fitted sloper anyway. So, incorporate this step in your planning if you are want to create an entire garment piece based on Nakamichi's projects.

THE GIVEAWAY

So, are you ready for the giveaway, readers? If yes, leave a comment by Wednesday, December 5, The winning comment (chosen by random drawing) will get Pattern Magic 2 in English.

One small detail! In your comment, please share with the rest of us which style, from those featured in this review, you like the most.

Good Luck!

PMPS Draft-Along #7: The skirt outline

$
0
0
Hope you have all your measurements and calculations ready, readers! Because we are going to draft the skirt sloper. This week, in three consequent posts, we will cover the outline, the front and the back of the skirt.

Before we start I wanted to share some exciting news: Kenneth D. King, who taught me most of the patternmaking, offered a copy of his e-book Skirts to one lucky draft-alonger. All you need to do is draft along, finish the sloper and the pencil skirt pattern and post an image of the finished project on our Flickr group board. The exact deadline will be announced next week.

Please follow along and post your questions here, or on the Flickr group board.

THE SKIRT OUTLINE

The skirt outline is basically a rectangle, with the width equal to our calculation for the low front (or back) hip, and the length equal to our desired sloper length. In other words, in this post, we will be drafting two rectangles: one for the back and one for the front. Easy, isn't it?

Here are the calculations and measurements you will need to draft your outline:
  • Outline height: for the outline I use the length I wear most frequently, which is 60 cm (appr. 23 1/2").
  • Outline width: use the respective calculation for the low hip when drafting the front and the back.
  • You will also need the waist to mid hip and the waist to low hip measurements to complete your outlines. 
Draft on the paper piece that is wide enough to accommodate both outlines, for the front and for the back. I won't be demonstrating this process step by step for it is relatively straight forward - the graphic below shows the final outcome. You start with the rectangle outline and then add the lines representing the mid hip and the low hip placement. The PDF version of the graphic is available on my Google Drive - you can download and print it out.
Kenneth uses an outline as a foundation for many different skirt styles. Yet some styles require different amount of ease and so a new outline needs to be drafted. This will be the case with our pencil skirt where we will need to reduce the ease even more. Don't despair, readers! It's a great exercise, and think, you will have a sloper, a pencil skirt and knowledge you can use to start drafting any skirt you want.

Happy drafting and don't forget the prize ;)

Pattern Magic and Pattern Magic 2: And the winner...

$
0
0
And the winner of the Pattern Magic 2 is...

... Heather Lou of  Closet Case Files.
She said: That first look is TO. DIE. FOR. My brain is exploding with the possibilities... how I would love to get my mits on this book!

Congratulations, Heather Lou! And thanks to Laurence King Publishing for this generous giveaway! Please, contact me with your shipping address at mvk(dot)fashion(at)gmail(dot)com.  

Abby won the first Pattern Magic book. Abby, please send me an email to claim your prize.

And stay tuned to another review and giveaway this week! It's holiday time!

Sewing Vintage Modern: a review

$
0
0
You don't have to be a vintage aficionado to appreciate this book. Burdastyle Sewing Vintage Modern by Nora Abousteit and Jamie Lau is more than just a guide to vintage styles. Chapter by chapter it shows you modern fashion inspired by widely recognizable decades of style from 1920s to 80s.

 
Each period chapter, like my favorite one about 20s and 30s, contains information about its style icons and designers, key silhouettes and must-have accessories, followed by instructions to recreate a modern version of the decade's signature looks.


PATTERNS

Five base patterns are the foundation for nineteen featured styles, with illustrated and detailed step-by-step instructions. 
"We'll walk you through what tools you'll need in your home sewing studio, how to take measurements, how to create a mock-up muslin, and how to make adjustments to the patterns as necessary... Luckily this book comes with five base patterns that will serve as your basic slopers, or pattern blocks. Consider these your templates, or building blocks, for creating clothing of many different styles."
Source: Amazon.com
The Patterns 101 chapter provides the reader with a guide on how to successfully work with the actual patterns in this book (or, as a matter of fact, with any patterns), and customize them to achieve a one-of-kind look.

In the example below, the bodice of the 1950s Elizabeth Gathered-Waist Dress (page 73) is transformed into a 1980s color-blocked top. Adding design lines and minimal pattern manipulation can be handled even by a beginner in sewing and in pattern-making.
Seven other styles, including a bustier and a blouse, are based on the very same bodice. And even if you are not making all these seven styles, it's worth checking out how the patterns were manipulated to change the look of a garment, making it travel through decades of style. If you don't have astrong background in patternmaking there are quite a few things to learn from the book.


Jamie Lau with the new Burdastyle book, Sewing Vintage Modern

As I write this, I am finishing my own project from the book: A 30s Greta Day Dress.  I made some changes but I don't want to reveal details just yet, please stay tuned to updates here and on Burdastyle. One thing I would like to mention though is that the fit is very good - as it is quite common with Burdastyle patterns.

Greta Day Dress and Amelia top
The only thing I wish the book had is an illustrated index of all projects featured in the book, a spread right after the table contents similar to those in Burdastyle magazine. However, it doesn't affect the overall quality of the book.

Overall, Sewing Vintage Modern not only provides an interesting overview of the 20th century fashions or gives a wide range of styles to recreate and to experiment with - it also manages to offer some very useful skills for home seamstresses of all levels. Do check it out, Amazon.com offers a discount you don't want to miss.


PMPS Draft-Along #8: Darts

$
0
0

Thank you for your patience, readers! I owe you some explanation. Once I started writing down pattern drafting instructions I realized that most of what you will find in books is drafted for a 'standard' and 'proportional' figure. Now, how many of you are 'standard'? I am a pear shape, with one size up in hips. So, would the rules for shaping a 'proportional' body apply to me?

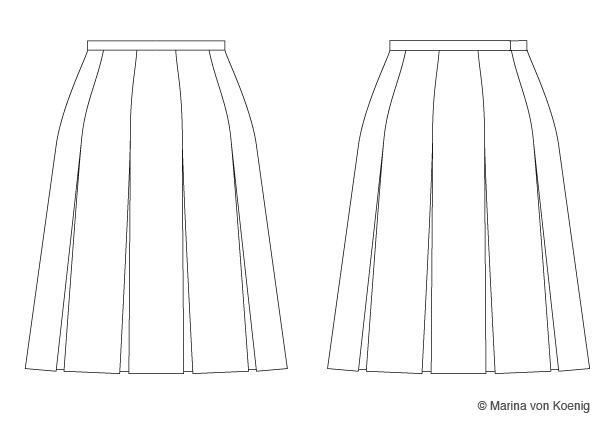
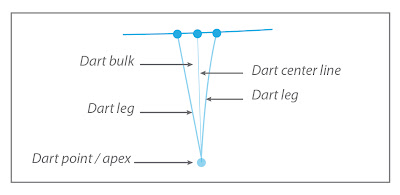
Let's look at the skirt as a geometric figure. It is somewhat similar to a cylinder all the way to the hips, and then it is shaped with the help of darts and side seams. The different variables that determine the shaping process are the dart width, the dart length, the  distance from the center front and center back, as well as dart shape.

Stay with me, it is not as complicated as it sounds. Please, read this post carefully and make notes for your particular case before we finally proceed with the drafting - the next worksheet is available here. Post your questions in comments or on the Flickr group. The main subject of this post is darts.


WAIST SUPPRESSION

Waist suppression (WSup) is the difference between your hip and waist circumference, or the amount of fabric that needs to be taken in to shape the skirt around hips. This shaping is achieved with the help of darts. But before we determine all the dart variables we need to calculate this waist suppression value for our front and back pattern pieces.

WSup = him circumference - waist circumference

The value you get will need to be distributed in darts, as well as side seams. So-called standard difference for a more or less proportional figure is 15 to 25 cm. (6 to 10"), so we will first cover dart distribution for a standard waist suppression value, and then look at possible figure variations.


DART WIDTH

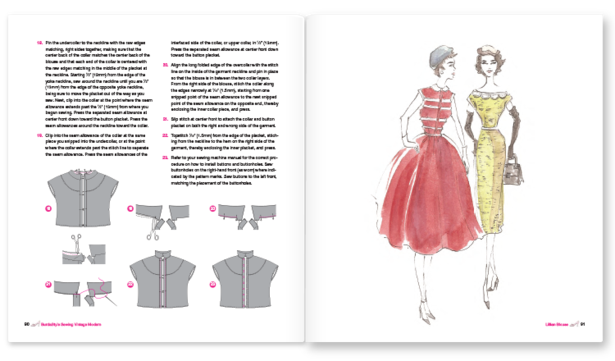
While creating this worksheet for this Draft-Along, I came across different instructions related to the dart width. Kenneth advises to take 3/4" (1,9 cm). Suzy Furrer has Dart Width Chart that gives some guidance but is not perfect (I won't go into details - it would be too nerdy). I checked a dozen of books, and only very few had some rational explanation for the dart width. So, after some calculations, below are the formulas I ended up with.

Before calculations, however, I would like to suggest to observe your body in a mirror and take in more where the curves are more pronounced. You must know your waist suppression value by now, so you will also know whether you are curvier than standard or not. If yes, look at yourself in the mirror and find out where are the most prominent curves (hips, tummy, seat bones), how are these areas shaped, how they relate to each other. In case of doubt, take pictures and post on our Flickr group. Images of the front and the side of your body can be helpful here.

Figures with W Sup = 15 to 25 cm (6 to 10")

Side seam intake = 0,5 x (W Sup : 2)

Front dart intake = 0,2 x
(W Sup : 2) 
front dart value will be between 1,5 and 2,5 cm

Back Dart intake = 0,3 x (W Sup : 2)

Below are some examples for figure variations. It may sound complicated, and you may think why bother if you are going to eliminate fitting issues later anyway on the muslin. Well, first of all, some preparatory work will reduce time for fitting. And even if use the standard formula above, it is worth reading those examples as they train your eye and your fitting sense.

Figures with  W Sup less than 15 cm (6")

In this case the hip curves are less pronounced, so, accordingly, there may be less shaping in the side seam. If you have a prominent tummy you may want, as an example, take in more in the front and in the back. Normally, back dart is slightly deeper than the front dart, but in this case you may get satisfactory results with an equal intake for both. Here is one possible calculation for the pattern draft.
 
Side seam intake = 0,4 x (W Sup : 2)

Front dart intake = 0,3 x
(W Sup : 2)

Back Dart intake = 0,3 x (W Sup : 2)

Figures with wider hips, with W Sup more than 25 cm (10")

Hello, pear shapes!  What we need to do in our case is increase the intake at the side seam, where the curves are strongest. As I have mentioned earlier, I am one size up in hips, so the formula below works best for me.

Side seam intake = 0,5 x (W Sup : 2) + 0,6 cm (1/4")

Front dart intake = 0,2 x
(W Sup : 2) - 0,6 cm (1/4")

Back Dart intake = 0,3 x (W Sup : 2)

If the difference is two, three sizes more, you may have to make additional adjustments and add another dart in the back. This is especially true for figures with a prominent seat. On the contrary, figures with a flat seat but wide hips may need a narrower back dart, with increased intake in the side seam.

Again, please, keep in mind that this formula is only a suggestion - your figure may be have other features that may influence the fit and you will achieve best results when fitting the muslin. However, these example may make your fitting somewhat easier.

DART DISTANCE

Dart distance is measured from the reference point to the dart center line. Note the distance for the darts on your Dart Worksheet. I discuss two methods of determining dart distance, with the second one being my preferred one.

Front dart

The rule for the front is: the dart distance for the front increases with the waist circumference, adding 1/8" for every 1" of the waist circumference. Here is the quick reference chart from Suzy Furrer's book. Note that here, the distance is measured to the nearest dart leg, not to the center line:
Waist              Dart distance
24"                 2 3/4"
25"                 2 7/8"
26"                 3"
27"                 3 1/8"
28"                 3 1/4"
29"                 3 3/8"
30"                 3 1/2"
31"                 3 5/8"
32"                 3 3/4"
33"                 3 7/8"
34"                 4"
add 1/8" to the dart instance for every additional 1" in the waist circumference
Another good pattern drafting system recommends placing front darts 6 to 8 cm (2 3/8" to 3 1/8") from the side seam, which comes slightly close to the side seam than in Suzy Furrer's or Kenneth King's instructions. 6 cm. is recommended  for a smaller waist, with 8 cm. as a maximum increase. Placing the dart closer to the side seam should be more aesthetically pleasing.  Personally, I prefer the latter method not only because it is easier to use, but also because it looks nicer.

Back dart

This one is simple, divide the back waist calculation in half to find the placement for the back dart center line.

DART LENGTH

Finally, the dart length can be easily referred using the following chart. It is converted from inches, that's why it looks somewhat weird in centimeters.

Dart width               Dart length
1 cm (3/8")              7,5 cm (3")        
1.9 cm (3/4")           9 cm (3 1/2")
2,5 cm (1")              10 cm (4")
3,2 cm (1 1/4")        11,5 cm (4 1/2")

This is it for today. Hope it doesn't look too intimidating. To make you feel better I should add that the most complex part of the drafting. the rest is just drawing lines, no more lengthy math calculations. Any questions?

Mood Sewing Network: Tweedy delights

$
0
0
Tweed is one of the nicest and easiest fabrics to sew, in my opinion. Did you know that the origin of tweed is said to be the Tweed River that flows along the border between England and Scotland? Yet, apparemtly, the name of the fabric is a result of a clerical error when tweel (old name for tweed  for its characteristic 2x2 twill weave) was misspelled as tweed. Anyway, it is a perfect wool fabric for beginners. It doesn't distort easily, reacts very well to steam and heat, easy to sew, easy to cut, easy to hide mistakes, it is reversible, durable, and, and, and...  So, once I decided to sew a dress with tweed it was pretty straight forward.


Ok, this is not one of those amazing dresses. It is rather quiet and simple, warm and very comfortable to wear. I worn it several times by now and I love it. However, despite its simplicity, as with many other projects I made this year, this one was about learning new couture techniques and this dress was worth a million for me.

Why? The Burdastyle pattern I chose is laid out on the bias for the front. The back is on straight grain. So, I wanted a layer between the wool and the body, and this pattern layout posed some challenges. What I did is underline the dress with silk charmeuse, with the front cut on the bias too. This required some experimentation and quite a few new skills on working with the bias, and, can you imagine, there are hardly any resources, except for some information in Threads Archive on working with bias.

I was very, very lucky though, because  Susan Khalje, a couture expert, author and teacher, generously shared with me quite a few tips for this project. I have been learning from her for a while now, but it was a revelation, thanks to this project, that Charles Kleibacker, American couturier who was also known as 'Master of the Bias' was Susan's mentor! This is as good as it gets, really!

It took me a while to research, experiment and prepare the fabric, but at the end there was no puling anywhere on the bias-cut front. Both fabrics behaved like one, despite the fact that they were both cut on the bias. I won't bore you with details here, as there will be a 'behind-the seams' post on Burdastyle.com where I will explain what I did.

Here, a few more shots - I was just fooling with the camera though - but at least you can see how the dress looks belted, or with a yardstick, ahem...


And, finally, my favorite, the Sewminatrix shot. Who was naughty here?


Stay warm!

Disclaimer: the fabric for this project was purchased using the Mood Sewing Network allowance for December.

The dawning of a branding blogger, or why I am no longer a part of the Mood Sewing Network

$
0
0
Things tend to happen when you expect them least, readers. Private issues and family emergency made me refrain from blogging and sewing for the entire month. Yet, luckily, everything seems to be returning to normal and I am able and happy to return to my home, blog and sewing routine.

One thing at a time now - Happy New Year and I really hope you had a great start into 2013 and are keeping up with your resolutions. I haven't made any, to be honest. Instead, I decided to do it step-by-step and focus as much as possible.

Let me first update you on one of the most noticeable changes here: you may have noticed that yours truly is not a member of the Mood Sewing Network any longer. Yes, I did start doing custom work and make couture garments for clients, but this is not the only reason I left. One day in November I looked back at the time I spent making the projects for the Network and realized that I am not spending it wisely.

I know there are bloggers who can sew several projects a month and I am truly fascinated by their productivity. As for me, I can make one or two couture garments a month, depending on their complexity. This alone made me crave for more flexibility in my choice of projects, which of course depend on fabrics. Mood has a wide selection of fabrics for competitive prices, but I was equally attracted to my favorite Paron Fabrics, B&J, or Gorgeous Fabrics as an online alternative. Naturally, as Mood Network blogger I had to do one project a month with Mood Fabric. The fabric allowance I was getting was a nice incentive, but I already have a significant fabric stash and after the first few projects I knew I don't want to purchase new fabrics just to tick the box, especially when I occasionally spotted a better choice elsewhere.


Being honest, exposure was another reason I joined the network. Let's admit, exposure may be the more significant incentive for a present or aspiring Mood blogger, especially since the times when the number of sewing bloggers was in double digits are long gone and there are many hundreds, or even thousands, of sewing and DIY blogs out there. Yet, despite this exposure and mostly positive experience, I came to conclusion that the deal with Mood didn't work for me, and that by the nature of what I personally do I was compromising my creative (and to certain extent, editorial) freedom by engaging myself in a long-term and exclusive relationship with a brand.

As the number of blogs grows so does the nature of self-promotion, advertising and consequent cooperation with brands... Looking beyond this particular relationship, I think it is time for sewing bloggers to understand the value of what we do and to re-assess (or to establish) our promotion and marketing strategies, because the recognition of blogs as an advertising and marketing channel is growing, and there will be a rewarding deal for every creative and hard-working blogger, beyond a free book or a class in exchange for a review.

I have learned a whole lot from being a part of the Mood Sewing Network, and, with its highs and lows, I think it was a very valuable experience. That's why I would like to thank Mood, and, especially, Eric Sauma for recognizing the potential of and embracing the blogging community, as well as setting an example of brand cooperation for many fashion industry vendors. Finally, of course, I wish all the best to my fellow bloggers who are still part of the Mood Sewing Network.
  
As always, I would be happy to hear what you think! Especially with regard to the present and the future of blogger cooperation with brands...

Sew Grateful Week #1: Tailoring classic giveaway

$
0
0
It's the Sew Grateful week again, readers. And I am so happy that one of my favourite bloggers, Debi of My Happy Sewing Place, is hosting it again.

Sew Grateful Week is all about sharing gratitude with the online sewing community and today I wanted to thank you for participating in this blog and leaving your feedback.

Monday is a Giveaway Day and I am joining other bloggers on Debi's Giveaway Page with a great book on tailoring:

Source

Published in 2005, "Tailoring is the classic guide to the required techniques. Step-by-step instructions and close-up photographs help hobby sewers get professional results. The book covers all three tailoring methods (custom or hand, machine, and fusible) and the complete process from fabric selection to finishing touches. There are detailed instructions on adjusting the pattern for proper fit, which is critical for good results. Tailoring is all about impeccable details, and shows how to achieve them, from the roll of the collar to a perfect pocket."

To enter the giveaway, please, leave a comment until Sunday, 10 February, sharing who are you grateful to for teaching you sewing. The winner will be drawn and announced on Sunday. Please, don't forget to check the results! Good luck!

Pimp my Pencil Skirt Sew Along: a belated update

$
0
0
Dear readers,

I am sorry this comes late, but I'd like to thank all of you who were so patient to wait with our sew-along. I know I haven't explained things, but I had to wrap my head around a few changes in my life and make important decisions, some of them related to this blog as well. I won't bore you with details, for now I am glad some of you are still interested in going on with the Burberry skirt. So, here is the update.


I will upload the remaining three posts on the straight skirt sloper this week, so you get Friday, Saturday and Sunday to make a muslin. All the fitting discussion will take place in our Flickr group - I am updating it too. For the following few days we will be working on a few alterations for the pencil skirt, adding princess lines and making the final muslin. Finally we will draft and position the flounce.

Until the next post, please have a look at our previous posts listed on the Sew-Along page. Please feel free to ask questions or make suggestions!

Sew Grateful to...

$
0
0
It's Sew Grateful Week Tuesday and, according to the plan, it is time for a reflection post. Phew, there is really a lot to reflect about, but I will be short and say a few very short words about people who played a particularly big role in my couture adventure.

First of all, Susan Khalje, an amazing couture teacher and instructor, or a couture fairy according to my fellow blogger Clio of Clio and Phineas. "Bibbidi-bobbidy-boo, you can sew lace!" said Susan waving her magic wand, and Clio went off and made a stunning silk and lace slip. Yes, Susan is my couture fairy too :)


Susan usually comes in duo with Kenneth D. King. Oh, Kenneth D. King and his Fortuny jackets. Kenneth is constantly experimenting and improving and learning and teaching. His teaching materials always have some updates, and in his class he would suddenly clap his hands and report about his most recent improvement of, say, welt pocket construction technique. He doesn't like when others talk a lot (during his classes), but he will talk all the time and you better listen because he is truly a well of knowledge and wisdom, even if some of his personal anecdotes are repeated more than once.

I am also very grateful to many fellow bloggers and former classmates who have become my close friends over the past three years, and, especially, my dear friend Rosie, Diane, Nel and Inna of Thewallina and other creatures. Thanks to you all, my readers, for reading my blog, leaving comments and being part of my couture adventure.

And, finally, I am so grateful to my family, and, especially, my husband who can now make a perfect couture small talk with any expert out there. I am so proud of him ;)

PMPS Sew-Along: Lekala Pattern 4214

$
0
0
Thanks, readers, for referring to this Lekala pattern:


As you see this skirt is very (very) similar to our Burberry inspiration skirt.


While I have never used Lekala patterns before, I must say it looks very promising and, if it is as good as it looks, we can use it in our sew-along. Our drafting plan will remain unchanged though, we will draft the skirt as planned - it is a great exercise in patternmaking.

CUSTOM FIT?

The site claims it is a custom fit.  With 4 (or 5) personalized measurements that you enter at check out, it probably comes closer to the real you than the Big 4. It should work well with a skirt, but I believe that the more complex the garment the less fit you get - it just doesn't take into consideration all the specifics of your figure. What these patterns do, obviously, is accomodate your height, your waist and your hips, but the remaining measurements that are plugged into system are taken from a 'standard' model. So the claim is somewhat high, but it is not that important for a skirt, which doesn't have as many variables as a jacket, for example.

NO RUSSIAN SPAM

I read those comments on sewing forums about spam, dangerous files, etc... Personally, I don't think the site is hijacked by some dangerous hackers targeting international home-sewing community. I bought the pattern using Paypal, downloaded the pattern and instructions, and my inbox is so far free from Russian spam. If you don't hear from me tomorrow, or the blog suddenly disappears - you will know who is behind it. Otherwise, Lekala seems to be a normal (Russia-based, I believe) business that tries to sell personalized computer-generated patterns for a very affordable price.

ORDERING & DOWNLOAD

If you worked with downloadable patterns before, this is no different. One annoying thing, though, is that the page layout is not very economical. My order was for a A4 paper format and I got a 38-page download, with 10 empty pages in between (they do print with a page identifier, though). I will go on and delete those empty pages in Adobe Acrobat, but not everyone knows how to do it.

As for delivery, the PDF containing the pattern was in my inbox in less than an hour. Since I have ordered as a guest, without registering, I had to download the instructions (a separate PDF) from the Lekala site directly. The instructions are very brief, and the translation from Russian is not very good, but you can definitely follow them. It is rather a list of steps, not a detailed description of the process - not very useful for a beginner.


WHAT HAPPENS NEXT

I will try to make a muslin this weekend and report to you next week. If you are very keen to start on it on your own, here is the link. The pattern costs an amazing $2.49, and if you register you will get further 10% off. No advertising, really, just facts.

Have you had any experience using Lekala patterns? Would you use this particular pattern for our sew-along? If not, why?

PMPS Draft Along #9: Straight Skirt Front

$
0
0

Readers, I must admit, I have never written such a detailed tutorial on pattern drafting. I've checked it several times for possible inaccuracies and should you still find some, please let me know as soon as possible!

In this tutorial I tried to explain every step where needed, such as placement of darts, making adjustments at the hem, etc. I used several resources as a guidance (some mentioned below), but I have adjusted the method trying to make it as accurate and as close to custom fit as possible. So far, it worked for my body. I hope the results will be worth it for you too.  

In this post I am covering the straight skirt front, and here are the drafting steps:
  1. Waist shaping
  2. Side seam 
  3. Waist dart
Note: To make the process easy to follow I am using letters in the alphabetical order to mark the step sequence on the pattern. If the Step 1 is A, for example, Step 2 will be B, Step 3 – C, and so on. This will ensure that you won’t skip steps, and can easily refer to instructions at any given step.

Let's check the points / lines on our skirt outline:

IMAGE: SKIRT OUTLINE
  • AD is the waist level
  • EF is the mid-hip level
  • GH is the low hip level
  • BC is the hem
Color coding in drafting: As an example, I use a blue or green pencils for the initial drafting; for adjustments, a red or orange; for the final adjustments I make after fitting the muslin, I use purple.

Before we start, please print out the linked PDF for drafting reference. You final pattern may look slightly different, but the drafting steps will be the same.


Step 1: WAIST SHAPING (point I)

Remember we measured the skirt length on the side, as well the lengths on the sides, center front and center back. We are going to use this measurements now to shape the waist. The reason we shape the waist is that having a straight line at the waist would result in excess fabric and cause wrinkling in that area. 

If you got two different measurements for your left side to floor and right side to floor, use the longer side measurement for the following calculation. Final adjustments for the asymmetrical sides can be made during the fitting. 

1. AI (waist shaping) = (skirt length at the (longer) side) - (skirt length at center front)

For a figure with flat stomach and/or curvy hips, point I will be under point A. If you have a protruding stomach and/or only slight hip curves, you may get a zero or negative value. In this case point I will be over or above point A.

Draft a waistline curve from point I to point D


Step 1: SIDE SEAM (points J to L)

To draft the side seam we will measure out waist, mid-hip and low hipcircumferences from the center front.

2. AJ (waist line) = (front waist line calculation) + (front dart calculation)

3. EK (mid-hip line) = mid hip calculation. 

Note: In most cases you won't need any adjustments for the point K. Only if you have a longer dart in the front, which extends below mid hip level, you may need to accommodate the dart intake when making final adjustments. 

4. GH (low-hip line) = low hip calculation

5. (optional) BL (hem line) = BC + 1.9cm (3/4") 

Just to explain how this step affects the look of your skirt. On our initial outline the width at the hem equals the width at the hip. If you leave it like that, your skirt will look slightly tapered at the hem when you wear it. So, it is really your personal decision.  1,9 cm. (or 3/4") are suggested by Kenneth D. King as a reasonable amount to add to create an illusion of a straight skirt. 

6. Connect points J, K, H and L (or C, if you skipped step 5) to draft your side seam.

Possible adjustments at this point: In his Skirts book, Kenneth points out that for some people (for example, for those with a wider waist measurement) the side seamline may make a dent-in at point J. In this case you can smooth out the curve at point J by adding out 0,3 to 0,6 cm (1/8" - 1/4") towards the side seam line DC.

7. True the hip curve length. 


Using a ruler, measure your low-hip length from the hip line (point H)  to point J on shaped waistline. If necessary, adjust the low-hip length. Sometimes, making the hip curve shallower or fuller helps reduce or, accordingly, increase the length of the curve. If the difference is significant you may need to reposition point J, but this will happen only in very specific cases.


Step 3: FRONT WAIST DART (points M to P)

Note: Two darts should be used if the difference between the waist and the hip circumference is over 10". Details will be explained in a separate post. 

8. JM (dart distance) = 6 to 8cm (2 3/8" to 3 1/4")

Example: my waist is 70cm  (27 1/2") and I am using the dart distance of 7cm (2 3/4"). It's really a judgement call, but generally I would use 7cm (2 3/4") for the waist range of 68 to 76cm (27" to  30"), and 6cm and 8cm for smaller and larger waist measurements respectively.

Please note that point M is the dart center, not the nearest dart leg!

As I have mentioned in my dart post, I like to position front darts closer to the side seam, as recommended by the German Muller & Sohn pattern drafting system. Darts positioned closer to the seam line tend to look more flattering on the body. This is especially true if you don't have a flat stomach. Unless you make your garment in a very lightweight fabric, you darts will create some bulk. Moving the dart with its bulk closer to the side seam will make the stomach appear flatter, and it will also make the waist appear wider. If your waist is much narrower than your hips, you may want to decrease this difference by placing the darts closer to the seam. You may as well want to do the opposite to create the illusion of a smaller waist by placing the darts closer to the center, but make sure you are not accentuating your tummy. Just consider all the variables before you go for any of the dart options.

So, if you decide to use a placement closer to the center, use the Suzy Furrer chart, in my case, each dart would be 1cm closer to the center.


Fine, enough lyrical deviation on the dart theme. Let's move forward!

9. OM=MN= 0.5 x dart width

ON is the final dart width that we calculated in the previous post.

10. MP = dart length

If you have a (relatively) flat stomach, the line MP is squared down from the waist line IJ.  ( For protruding stomach, the dart point should be shifted toward the side seam ) Use the value calculated in the previous post.

Example: my dart intake is 3 cm (1 1/8") corresponding to the dart length of 10,5 cm (4 1/8").

Connect the points to draft the legs. NP is a straight line, and OP is slightly curved inward.

True the legs of the dart by adding to the shorter leg and correcting the curve.

To correct the curve,
(1) place the dart point over a corner of the table, with the dart on the table surface; (you will need a small cardboard sheet or cutting mat underneath to protect the table)
(2) crease the dart leg closer to the center with your fingers by pinching the paper;
(3) fold this line over to match the other dart leg, pivoting the folded paper portion from the dart point;
(4) temporarily tape the matched dart legs to close the dart.
(5) using a french curve, or a curved ruler, redraw the curve with a tracing wheel, making sure it perforates all the layers of the folded out dart.
(6) open the dart
(7) redraw the waist curve with a pencil, following the perforated line.

11. If your dart crosses the mid-hip line (EK), measure out the dart intake on the mid-hip line from K toward point F to find point K'. Redraw the seam line J-K'-H-L.


FINAL PATTERN

Your final skirt front pattern follows the points I-N-O-J-K-H-L-B-G-E

If you went for a slightly tapered look and didn't add width at the hem (point L), your pattern follows the points I-N-O-J-K-H-C-B-G-E

Please, copy your final pattern following the points above (including point C) to a new pattern paper. It will help make final alterations for the muslin. Make sure your pattern paper can accomodate the back pattern piece as well.

THE SKIRT FRONT IS DRAFTED!
Congratulations!

Please do leave comments and ask questions even if you haven't started drafting yet. I would love to hear how you are doing. Also, post on our Flickr group with or without pictures, it would be interesting to follow specific cases. 

PMPS Draft Along: Important

$
0
0
Dear readers, if the next Skirt Back post appeared in your reader, please disregard it - it was unedited version. I pressed 'publish' by accident, the post is back to drafts. For now, draft the skirt front only!

Please, post the pictures of the drafted front on Flickr so I can upload the next post. Jolly drafting!

And the winner of the Classic Tailoring book is...

$
0
0
...
...
+AnaJan Stepalica, a passionate seamstress and blogger from Belgrade, Serbia!!!

This is what she said:
"I'm thankful to my parents for letting me learn to sew. I was self taught when it comes for sewing. I started in my early youth, by making clothes for my Barbie dolls. I remember a situation when my dad was vacuum cleaning the room where I used to sew. He was on his knees and all of the sudden he screamed in pain as a pin perforated his knee. I was punished for a week, being forbidden to sew. After a while my parents gave me a sewing machine, and that was a beginning of a beautiful friendship that still lasts!"
Congratulations, Ana, and enjoy the book!


Ana, please contact me at mvk(dot)fashion(at)gmail(dot)com with a mailing address!

Thanks to all of you for leaving wonderful comments and sharing your stories on these pages. I enjoyed reading each of them.

CoutureGRAM: Chanel jacket

$
0
0
As you all heard, often a picture is worth a thousand words. In this new post series I would like to post images of couture clothing I found on the web and elsewhere.

A question to you, readers: what could be the purpose of the center back seam? I don't have a ready answer. (Thanks to Sewing Sveta for asking)


Please do leave a comment if you enjoyed this post, or if you have any questions or thoughts to share...
Viewing all 178 articles
Browse latest View live


<script src="https://jsc.adskeeper.com/r/s/rssing.com.1596347.js" async> </script>