Four-day holiday, including an ample Thanksgiving dinner and a fat-burning hike in Westchester is a way to go! Only little sewing happened, of course,.. but, I have more energy again to tackle the upcoming workload, not only with the Sew along, but with my next Burdastyle challenge and Mood Sewing Network project of the month.
Back to the Sew-Along. Today we will talk about measurements and calculations for pattern-drafting. If you missed some posts, check out the Sew-along page for links and more.
As I am starting to demonstrate the drafting process I wanted to share that most of what you will see here I learnt by taking classes with Kenneth D. King, as well as from a great pattern-drafting book by Suzy Furrer, 'Building Patterns: Architecture of Women's Closing' (out-of-print and meanwhile way too expensive). I highly recommend both authors and experts, and if you are interesting in learning more, Kenneth's book 'The Skirts' has a lot of information and instructions on a wide variety of skirt styles. Of course, there are quite a few good books on pattern drafting, but those I mentioned are especially good if you want to draft a custom pattern. The great news is that Kenneth has generously agreed to share some of the materials from theSkirts book on this blog, and in the upcoming days I will provide a detailed review of it for those who want to know more (and guess what - he also offered a copy of the book to one lucky reader - holiday season has started here! - but more about it later).
So, let's start with measurements. While you will be able to measure all circumferences yourself, you will need someone to help you measure the length, as well as a few tools. It is important that all the measurements are taken in one session. Since the skirt is drafted from the sloper, don't wear anything too thick for measurement taking - thin leggings or tights are good.
![]()
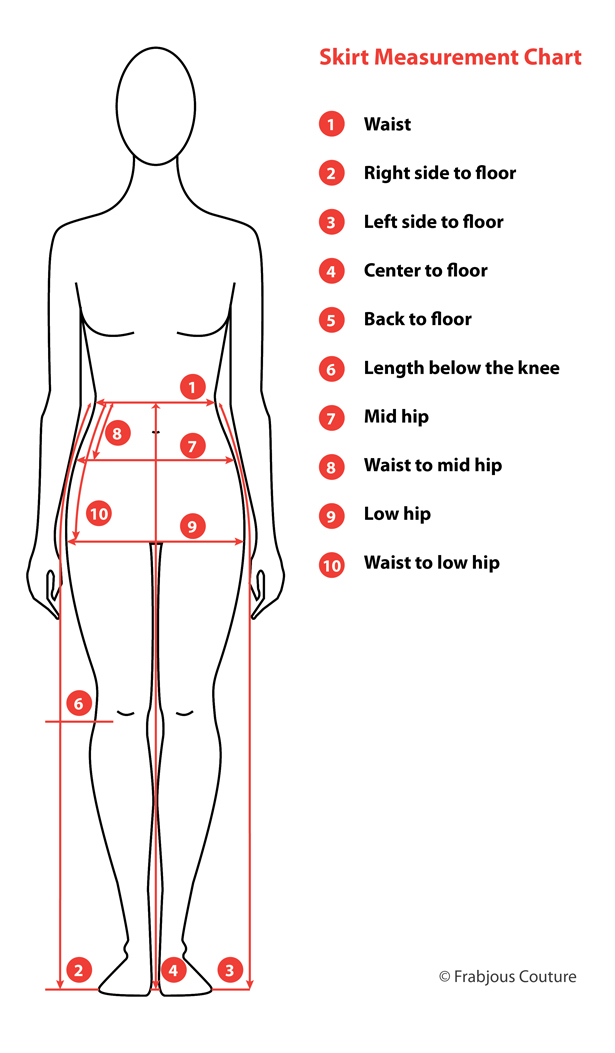
Waist circumference (1): place elastic at the waist and check whether the elastic is level, or parallel to the floor. take the measure around the elastic
Skirt length: All the sloper measurements below are measured from the elastic base to the floor
Note: unless you have a perfectly symmetrical body I recommend measuring the skirt length to floor before getting to the hip depth and circumference. The reason is that often one side is longer than the other. When drafting a pattern we will be using the longer side measurements, any necessary adjustments on the shorter side can be tackled during the fitting. So, when you will be taking waist-to-mid-hip, and waist-to-hip measurements, remember to take them on the longer side.
First, we are measuring right side to floor (2), left side to floor(3), front to floor(4) and back to floor (5). Taking these four measurements will help us determine whether our lower body is asymmetrical, as well as give us guidelines for determining waist shaping.
Next, we will measure the length for our pencil skirt, which will be the belowknee-length(6), approximately 2,5 cm. (1") below mid-knee in the front and the crease at the back of the knee in the back. This measurement is taken at the (longer) side.
Mid-hip circumference (7): place elastic at approximately 11,5 cm (4 1/2") below the waist and measure around elastic. This is the placement for the height between 165 to 175cm (5'4" to 5'9"). Lower or raise the elastic for taller and shorter height respectively - 1,2 cm(1/2") down or up.
Waist to mid hip (8) on the (longer) side: note down the distance from the base of the waist eleastic to the base of the mid-hip elastic.
Low hip (9) circumference: lower the elastic from your mid-hip to the fullest part of your hip - it will be approximately at 21,5 cm - 23 cm (8.5" - 9").
Note: at this point I like to compare the mid-hip and the hip circumference. If the mid-hip measurement is larger than the low hip measurement (one of the reasons is a protruding tummy), go with a larger (mid hip) measurement for the low hip as well. On your measurement chart note down the larger circumference next to your low hip section and, in brackets, the actual measured width.
Waist to hip (10) on the (longer) side: Take this measurement at the same side as mid-hip (which should be the longer side if your body is asymmetrical). It may be within the range of 21,5 cm - 23 cm (8.5" - 9"), or shorter/longer depending on your height and body.
This should get you started! Don't forget to download the Measurement & Calculation Sheet (links above), and if you are experiencing any troubles let me know at mvk(dot)fashion(at)gmail(dot)com. Post your questions here or on our Flickr discussion board.
![]()
Back to the Sew-Along. Today we will talk about measurements and calculations for pattern-drafting. If you missed some posts, check out the Sew-along page for links and more.
As I am starting to demonstrate the drafting process I wanted to share that most of what you will see here I learnt by taking classes with Kenneth D. King, as well as from a great pattern-drafting book by Suzy Furrer, 'Building Patterns: Architecture of Women's Closing' (out-of-print and meanwhile way too expensive). I highly recommend both authors and experts, and if you are interesting in learning more, Kenneth's book 'The Skirts' has a lot of information and instructions on a wide variety of skirt styles. Of course, there are quite a few good books on pattern drafting, but those I mentioned are especially good if you want to draft a custom pattern. The great news is that Kenneth has generously agreed to share some of the materials from theSkirts book on this blog, and in the upcoming days I will provide a detailed review of it for those who want to know more (and guess what - he also offered a copy of the book to one lucky reader - holiday season has started here! - but more about it later).
So, let's start with measurements. While you will be able to measure all circumferences yourself, you will need someone to help you measure the length, as well as a few tools. It is important that all the measurements are taken in one session. Since the skirt is drafted from the sloper, don't wear anything too thick for measurement taking - thin leggings or tights are good.
YOU WILL NEED:
- two pieces of elastic to tie around your waist and hips
- measuring band
- full-length mirror for measuring and fitting.
- Skirt Measurement and Calculations Sheet (download a metric or inches version from my Google drive)
MEASUREMENTS:
Waist circumference (1): place elastic at the waist and check whether the elastic is level, or parallel to the floor. take the measure around the elastic
Skirt length: All the sloper measurements below are measured from the elastic base to the floor
Note: unless you have a perfectly symmetrical body I recommend measuring the skirt length to floor before getting to the hip depth and circumference. The reason is that often one side is longer than the other. When drafting a pattern we will be using the longer side measurements, any necessary adjustments on the shorter side can be tackled during the fitting. So, when you will be taking waist-to-mid-hip, and waist-to-hip measurements, remember to take them on the longer side.
First, we are measuring right side to floor (2), left side to floor(3), front to floor(4) and back to floor (5). Taking these four measurements will help us determine whether our lower body is asymmetrical, as well as give us guidelines for determining waist shaping.
Next, we will measure the length for our pencil skirt, which will be the belowknee-length(6), approximately 2,5 cm. (1") below mid-knee in the front and the crease at the back of the knee in the back. This measurement is taken at the (longer) side.
Mid-hip circumference (7): place elastic at approximately 11,5 cm (4 1/2") below the waist and measure around elastic. This is the placement for the height between 165 to 175cm (5'4" to 5'9"). Lower or raise the elastic for taller and shorter height respectively - 1,2 cm(1/2") down or up.
Waist to mid hip (8) on the (longer) side: note down the distance from the base of the waist eleastic to the base of the mid-hip elastic.
Low hip (9) circumference: lower the elastic from your mid-hip to the fullest part of your hip - it will be approximately at 21,5 cm - 23 cm (8.5" - 9").
Note: at this point I like to compare the mid-hip and the hip circumference. If the mid-hip measurement is larger than the low hip measurement (one of the reasons is a protruding tummy), go with a larger (mid hip) measurement for the low hip as well. On your measurement chart note down the larger circumference next to your low hip section and, in brackets, the actual measured width.
Waist to hip (10) on the (longer) side: Take this measurement at the same side as mid-hip (which should be the longer side if your body is asymmetrical). It may be within the range of 21,5 cm - 23 cm (8.5" - 9"), or shorter/longer depending on your height and body.
This should get you started! Don't forget to download the Measurement & Calculation Sheet (links above), and if you are experiencing any troubles let me know at mvk(dot)fashion(at)gmail(dot)com. Post your questions here or on our Flickr discussion board.
